Thinking about selling your Chelsea loft but unsure how to stage all that volume, brick, and steel so it photographs beautifully and wows in person? You are not alone. Loft buyers in this neighborhood are design minded and expect a curated, gallery-ready presentation that honors the architecture. Below you will learn practical, proven staging moves that showcase scale, light, and wall space for art, plus marketing tips that speak directly to Chelsea’s audience. Let’s dive in.
Why Chelsea loft staging is different
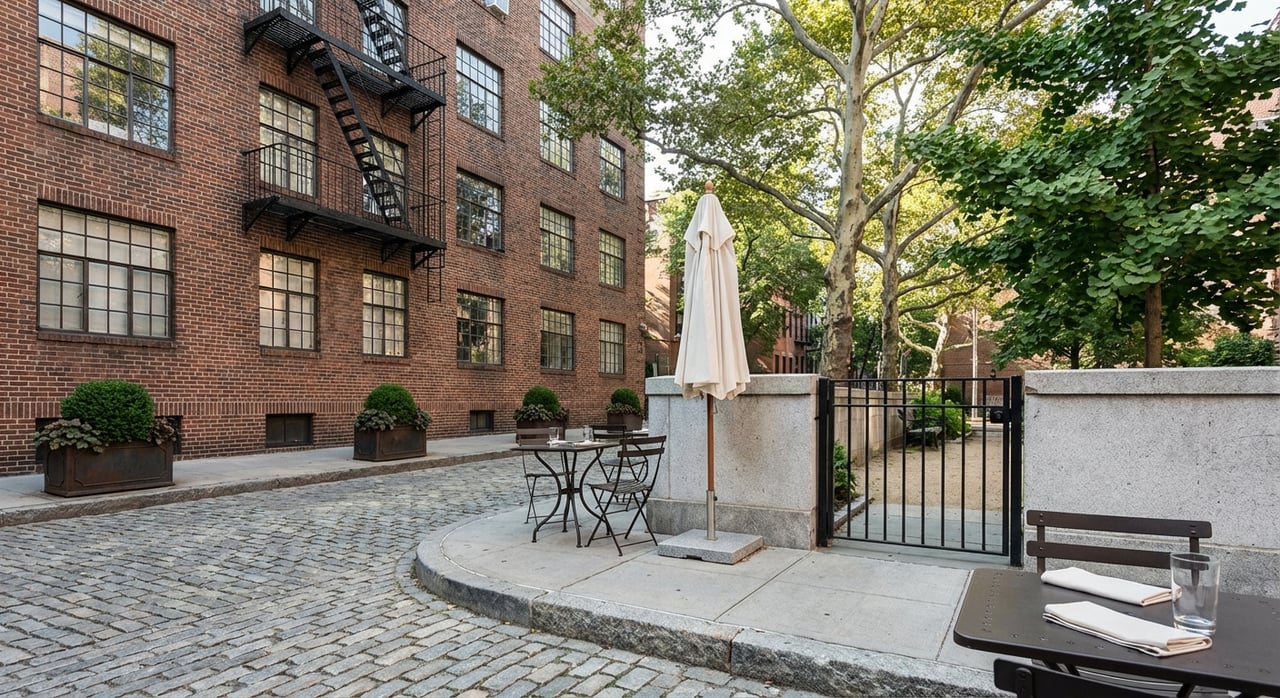
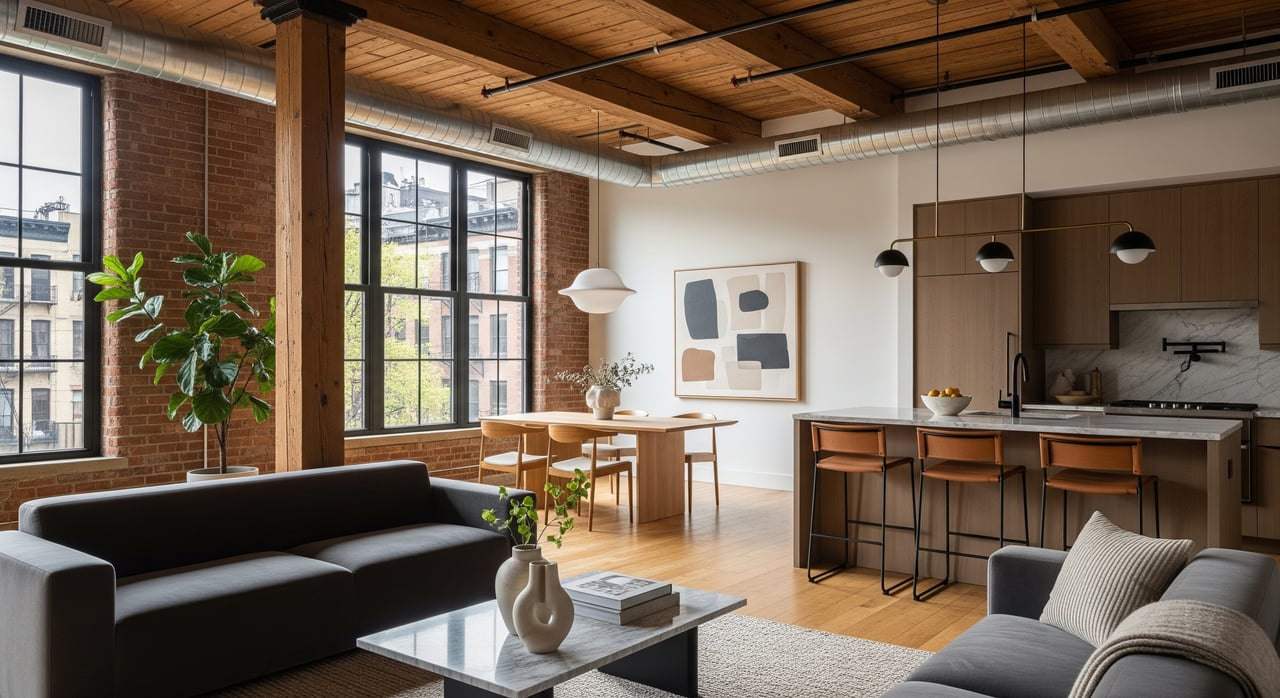
Chelsea and West Chelsea are known for converted industrial lofts with high ceilings, large windows, exposed brick, and visible beams. These features are powerful selling points, yet they also create challenges with scale, echoes, and uneven light. The goal is to highlight the bones while making the space feel warm, functional, and photogenic.
Buyer profile and what they value
Design-savvy buyers here often include collectors, interior designers, architects, and professionals who appreciate authentic details. They look for flow, generous wall runs for large works, and consistent natural light that feels favorable for art and living. When you define clear zones for living, dining, work, and display, you help them visualize a home that also functions like a private gallery.
Building rules and logistics
Many Chelsea lofts sit in co-op or condo conversions. Check house rules early for open house policies, approvals for staging teams, insurance requirements, and any limits on installing lighting or art. This step avoids last-minute delays and protects the fabric of the building and the loft itself.
Start with spatial editing
The first job is helping buyers read the loft’s volume and flow. Remove personal items, extra small furniture, and anything that blocks views of windows, brick, or columns. Replace clutter with a few curated objects that suggest a design-forward lifestyle.
Clear sight lines and zones
- Define 3 to 5 zones with rugs and furniture groupings, such as entry, living, dining, work, and bedroom.
- Keep sight lines to major features unobstructed for both showings and photography.
- Float seating to create pathways that show circulation, rather than pushing everything against walls.
Scale furniture to the room
Choose larger-scale, low-profile pieces that match the volume of the loft. Too many small items read as clutter and make photos feel busy. Use warm woods, leather, wool rugs, and metal accents to complement the industrial character while softening the feel.
Light like a gallery
Light is everything in a deep, open plan. Many lofts have uneven daylight, so layered lighting is essential for showings and photos.
Layered lighting plan
- Ambient: dimmable overheads or central fixtures to balance the whole room.
- Task: reading lamps, kitchen under-cabinet strips, and desk lighting for work zones.
- Accent: track or picture lights directed to art and textured walls.
- Use color-balanced bulbs to avoid mixed color temperatures.
Photo lighting tips and logistics
For photography, fill shadowed corners with portable warm lights. Confirm building rules for temporary fixtures and electrical load. If you add or adjust track lighting, use a licensed electrician and secure approvals when needed.
Hang and style art with intent
Your walls are valuable display real estate. Show buyers how art lives here without overwhelming the space.
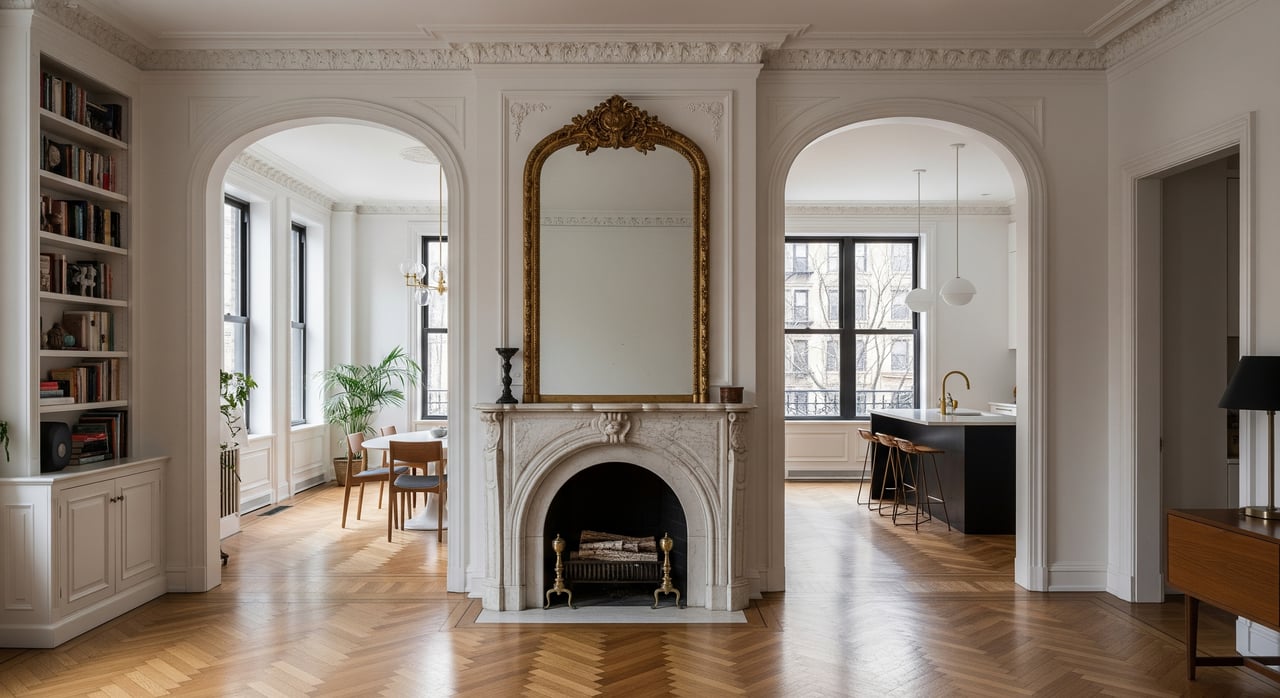
Museum-level placement
Hang most works with centers around 57 to 60 inches from the floor. Give oversized pieces air on all sides, and consider hanging them slightly lower to sit with a sofa or console. A single strong piece on a major wall often photographs better than a crowded arrangement.
Curated vignettes
Use a light hand with lifestyle vignettes. A console with a sculptural object, an edited stack of art books, and a leaner frame can suggest a collector’s mindset. A small drafting table or desk with minimal tools can imply a creative work area. Keep props sparse and intentional.
Honor the industrial bones
Do not hide beams, columns, or exposed mechanicals. Spotlight them. Warm textiles and wood tones balance concrete, brick, and steel. Where walls are textured, choose large-scale art that complements rather than competes. If your loft has notable provenance or a thoughtful renovation, note it in the listing copy to add credibility and context.
Photography and narrative marketing
Staging only works when your listing images and story connect with the right buyers. Plan both together.
Photography essentials
Hire a photographer experienced with high-volume lofts. Ask for wide hero shots that show full width and long sight lines, plus detail images that capture texture, lighting, and styled vignettes. Responsible use of wide lenses helps avoid distortion, and multiple exposures can preserve window views. Consider twilight or evening interiors with warm light for lifestyle appeal.
Write a hook buyers feel
Pair your photos with a concise, design-forward narrative. Highlight architectural bones, wall runs, consistent light, and any recent upgrades that support art and living. Think in phrases that speak to collectors and creatives, such as “continuous north-facing wall run” or “gallery-ready lighting.”
Physical vs. virtual staging
Virtual staging can show alternate layouts or furnish an empty space. For design-oriented buyers, physical staging is often more persuasive because it demonstrates scale, lighting, and materials. If you use virtual images, make sure they look authentic and clearly disclose that they are virtually staged.
Costs, ROI, and timeline
Treat staging as part of your marketing plan. Every property is unique, and costs vary by scope, but professional styling and photography usually create outsized impact for a loft.
Budget and value
You can tailor the scope from light styling to full furniture rental and lighting. Pair spending with a strong photo plan and targeted outreach. The return often shows up in better online engagement and stronger in-person first impressions.
Timeline to launch
- 2 to 3 weeks out: edit belongings, complete small repairs, deep clean, finalize staging plan.
- 1 week out: deliver furniture, install lighting, style vignettes, schedule photography.
- Listing day: final tweaks and shoot during the best natural light; plan a broker preview.
Pro stager or owner-led
Bring in a professional if your loft is very large, oddly proportioned, or needs elevated presentation for a discerning audience. Owner-led styling can work for small edits, but still invest in a professional photographer and a stylist for final polish.
Chelsea loft staging checklist
- Declutter personal photos, excess small furniture, and anything that breaks sight lines.
- Create 3 to 5 zones using rugs and groupings for entry, living, dining, work, and sleep.
- Choose low-profile, larger-scale furniture; float seating to show flow.
- Layer light: ambient, task, and accent; use track or picture lights for art.
- Hang key works at 57 to 60 inches center; favor fewer, larger focal pieces.
- Style 3 to 4 vignettes, such as a collector’s console, studio desk, and dining scene.
- Prep for photography: schedule for ideal natural light and include hero and detail shots.
- Confirm co-op or condo rules, insurance for any high-value art, and installation approvals.
Next steps
If you want a sale that speaks to Chelsea’s design audience, start with scale, light, and a clear narrative. Edit the space, plan lighting that photographs well, and showcase art walls and provenance. Then pair the results with images and copy that tell a cohesive story to the right buyers.
Ready to refine your plan for a Chelsea loft sale? Request a confidential market valuation with Leah Blesoff to discuss staging, narrative marketing, and timing.
FAQs
How should I stage a Chelsea loft for design-savvy buyers?
- Focus on clear sight lines, defined zones, layered lighting, and a curated art presentation that highlights wall runs and scale.
What furniture works best in large open-plan lofts?
- Use larger-scale, low-profile pieces and float seating to show circulation, avoiding many small items that clutter photos.
How high should I hang art in a loft?
- Aim for centers around 57 to 60 inches from the floor, giving oversized works space and aligning them with nearby furniture groupings.
Should I hide exposed ducts, beams, or columns?
- No; treat them as character features and balance them with warm materials and accent lighting.
Is virtual staging enough for a Chelsea loft listing?
- It can help show options, but physical staging often persuades design-minded buyers by proving scale, texture, and lighting in real space.
What building rules affect staging in co-ops or condos?
- Confirm approvals for staging teams, lighting installs, moving logistics, open house schedules, and any insurance requirements before you begin.